Photo

Scanner group test

TL:DR Avoid scanners with Contact Image Sensors if you care at all about color fidelity.

Vermeer it is not

After my abortive trial of the Colortrac SmartLF Scan, I did a comparative test of scanning one of my daughter’s A3-sized drawings on a number of scanners I had handy.

Scanner Sensor Scan
Colortrac SmartLF Scan CIS ScanLF.jpg
Epson Perfection Photo V500 Photo (manually stitched) CCD Epson_V500.jpeg
Epson Perfection V19 (manually stitched) CIS Epson_V19.jpg
Fujitsu ScanSnap S1500M (using a carrier sheet and the built-in stitching) CCD S1500M_carriersheet.jpg
Fujitsu ScanSnap SV600 CCD SV600.jpg
Fuji X-Pro2 with XF 35mm f/1.4 lens, mounted on a Kaiser RS2 XA copy stand with IKEA KVART 3-spot floor lamp (CCT 2800K, a mediocre 82 CRI as measured with my UPRtek CV600) CMOS X-Pro2.jpg

I was shocked by the wide variance in the results, as was my wife. This is most obvious in the orange flower on the right.

Comparison

I scanned a swatch of the orange using a Nix Pro Color Sensor (it’s the orange square in the upper right corner of each scan in the comparison above). When viewed on my freshly calibrated NEC PA302W SpectraView II monitor, the Epson V500 scan is closest, followed by the ScanSnap SV600.

The two scanners using Contact Image Sensor (CIS) technology yielded dismal results. CIS are used in low-end scanners, and they have the benefit of low power usage, which is why the only USB bus-powered scanners available are all CIS models. CIS sensors begat the CMOS sensors used by the vast majority of digital cameras today, superseding CCDs in that application, I would not have expected such a gap in quality.

The digital camera scan was also quite disappointing. I blame the poor quality of the LEDs in the IKEA KVART three-headed lamp I used (pro tip: avoid IKEA LEDs like the plague, they are uniformly horrendous).

I was pleasantly surprised by the excellent performance of the S1500M document scanner. It is meant to be used for scanning sheaves of documents, not artwork, but Fujitsu did not skimp and used a CCD sensor element, and it shows.

Pro tip: a piece of anti-reflective Museum Glass or equivalent can help with curled originals on the ScanSnap SV600. I got mine from scraps at a framing shop. I can’t see a trace of reflections on the scan, unlike on the copy stand.

Update (2018-10-14):

Even more of a pro tip: a Japanese company named Bird Electron makes a series of accessories for the ScanSnap line, including a dust cover for the SV600 and the hilariously Engrish-named PZ-BP600 Book Repressor, essentially a sheet of 3mm anti-reflection coated acrylic with convenient carry handles. They are readily available on eBay from Japanese sellers.

Colortrac SmartLF Scan review

TL:DR summary

Pros:

  • Scans very large documents
  • Easy to use
  • Packs away in a convenient carrying case

Cons:

  • So-so color fidelity
  • Hard to feed artwork straight
  • Dust and debris can easily get on the platen, ruining scans
  • Relatively expensive for home use

Review

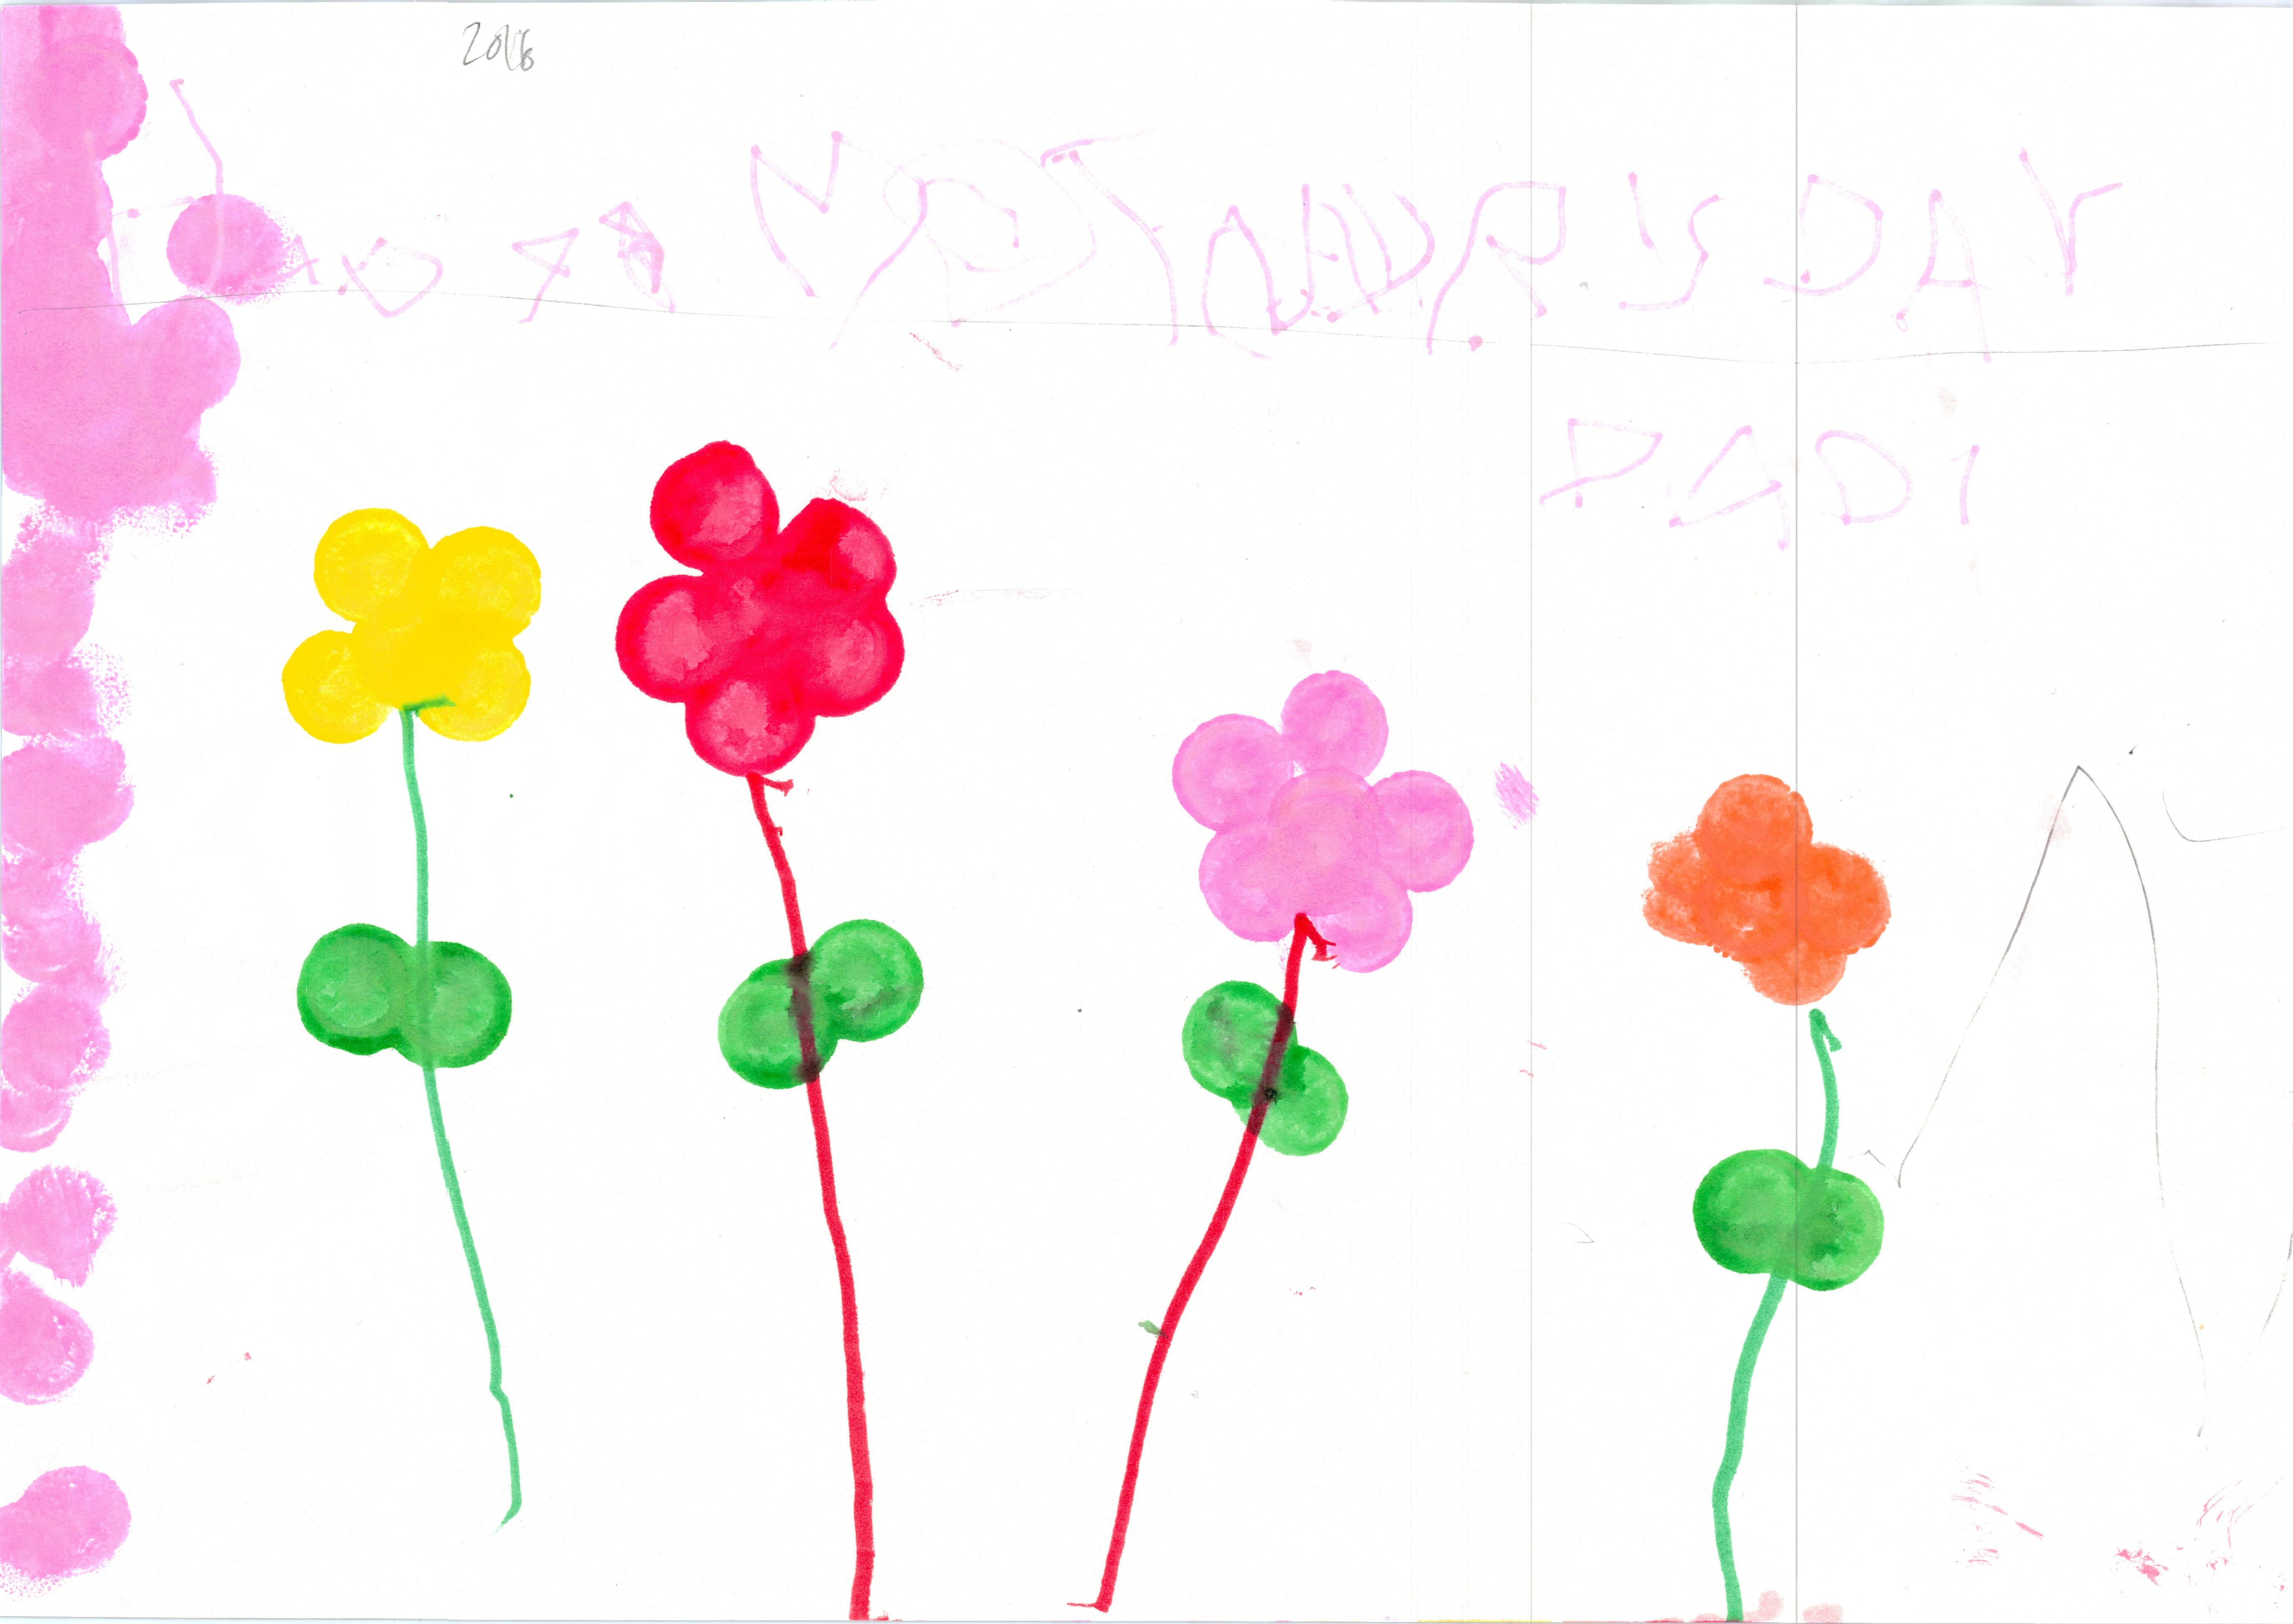
One thing you do not lack for when your child enters preschool is artwork. They generate prodigious amounts of it, with gusto, and they are often large format pieces on 16×24″ paper (roughly ISO A2). The question is, what do you do with the torrent?

I decided I would scan them, then file them in Ito-Ya Art Profolios, and possibly make annual photobooks for the grandparents. This brings up the logistical challenge of digitizing such large pieces. Most flatbed scanners are limited to 8.5×14″ (US Legal) format. Some like the Epson Expression 11000XL and 12000XL can scan 11×17″ (A3), as can the Fujitsu ScanSnap SV600 book scanner, but that is not fully adequate either. One option would be to fold the artwork up, scan portions then stitch them together in AutoPanoGiga or Photoshop, but that would be extremely cumbersome, specially when you have to do a couple per day. I do not have access to a color copier at my office, and most of these are only A3 anyway.

I purchased a Kaiser RS2 XA copy stand (cheaper to get it direct from Europe on eBay than from the usual suspects like B&H) and got a local framing shop to cut me a scrap of anti-reflective Museum Glass. This goes up to 16×20″ for the price of a midrange flatbed scanner, but it is tricky to set up lights so they don’t induce reflections (no AR coating is perfect), perfectly aligning the camera with the baseboard plane is difficult (I had to shim it using a cut-up credit card), and this still doesn’t solve the problem of the truly large 16×24″ artwork (stands able to handle larger formats are extremely expensive and very bulky).

I then started looking at large-format scanners like those made by Contex or Océ. They are used by architecture firms to scan blueprints and the like, but they are also extremely large, and cost $3000-5000 for entry-level models, along with onerous DRM-encumbered software that requires license dongles and more often than not will not run on a Mac. They are also quite bulky, specially if you get the optional stands.

That is why I was pleasantly surprised to learn British company Colortrac makes a model called the SmartLF Scan! (I will henceforth omit the over-the-top exclamation mark). It is self-contained (can scan to internal memory or a USB stick, although it will also work with a computer over USB or Ethernet, Windows-only, unfortunately), available in 24″ or 36″ wide versions, is very compact compared to its peers, and is even supplied with a nifty custom-fitted wheeled hard case. The price of $2,000 ($2,500 for the 36″ version), while steep for home use, is well within the range of enthusiast photo equipment. I sold a few unused cameras to release funds for one.

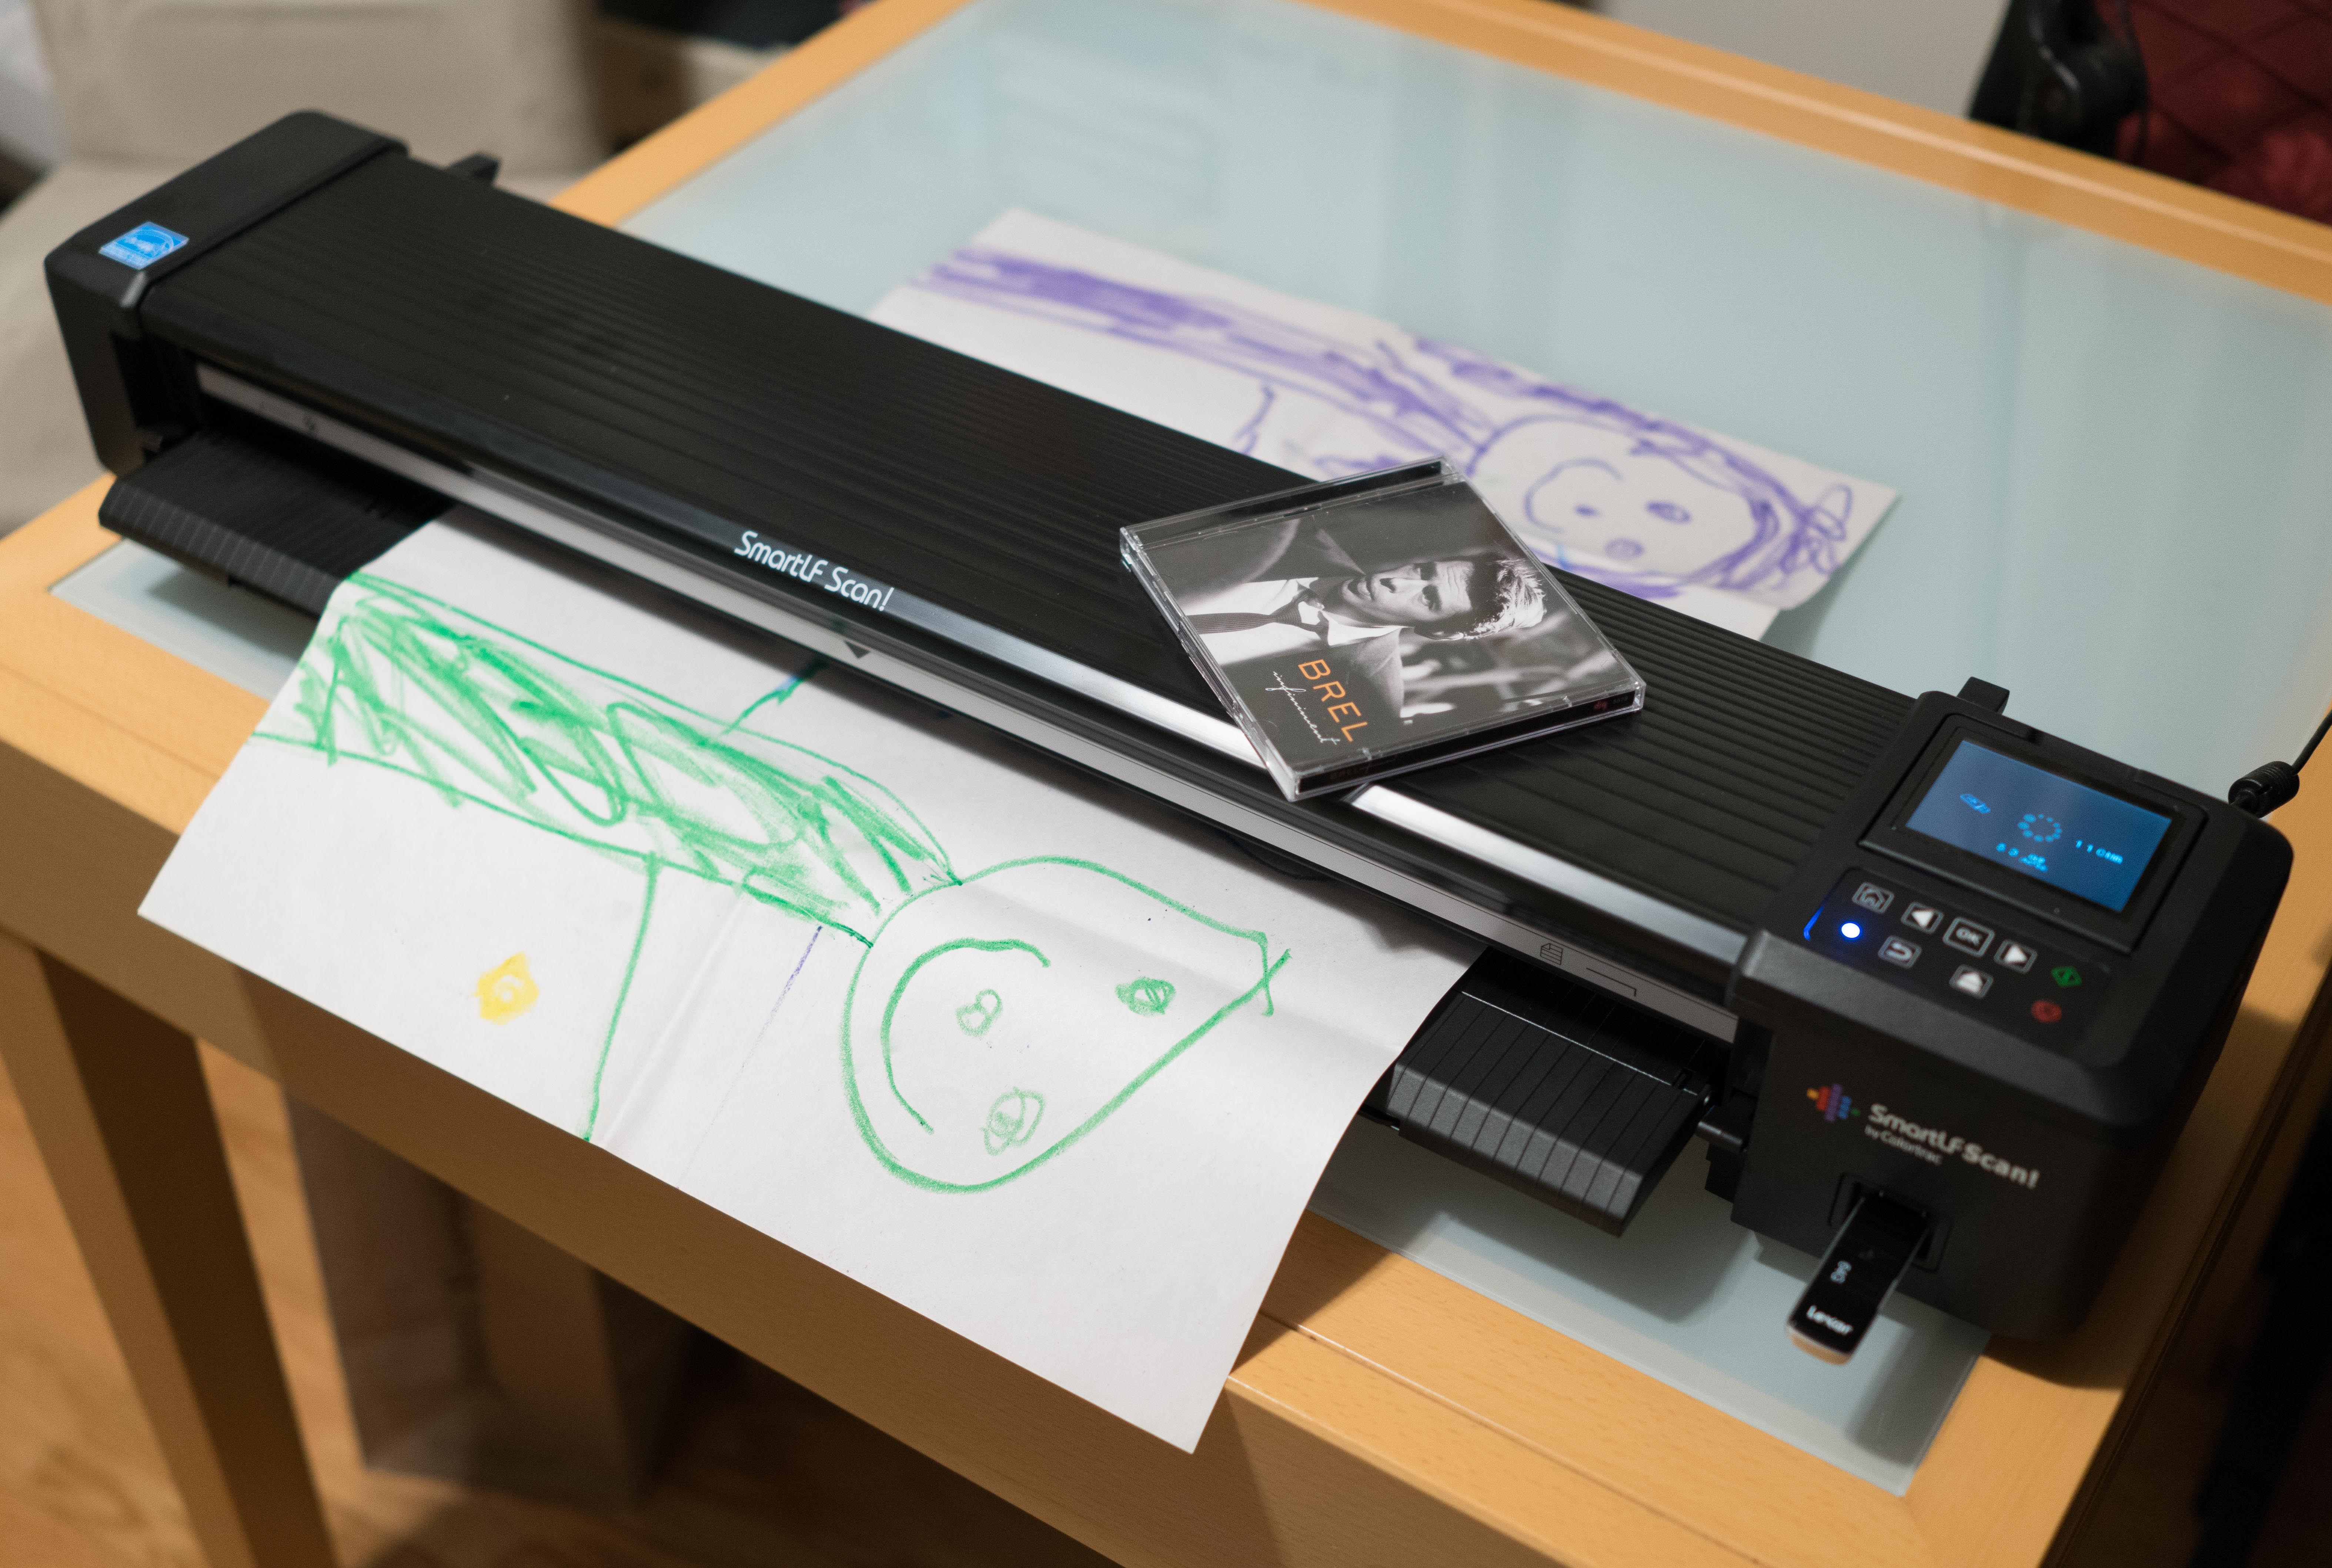
Once unpacked, the scanner is surprisingly light. It is quite wide, obviously, to be able to ingest a 24″ wide document (see the CD jewel case in the photo above for scale). There is a LCD control panel and a serviceable keypad-based (not touch) UI. The power supply is of the obnoxious wall-wart type. I wish they used text rather than inscrutable icons in the UI—it is much more informative and usable to see a menu entry for 400dpi resolution rather than checkerboard icons with various pitches.

After selecting your settings (or saving them as defaults), you load paper by feeding it from the front, face up. It is quite hard to feed large-format paper straight, and this is compounded by the lack of guides. On the other hand it is hard to see how Colortrac could have fitted photocopier-style guide rails in such a compact design, and they would be likely to break.

The scanner is simplex, not duplex, unsurprisingly at that price point. The sensor is on top of the feed, which helps control dust and debris sticking to it, but when scanning painted artwork, there will inevitably be crumbs of paint that will detach and stick to the sensor platen. This manifests itself as long dark vertical lines spoiling subsequent scans, something I occasionally also see on my Fujitsu ScanSnap document scanner. Cleaning the Colortrac is way easier than on the ScanSnap, as unfolding rear legs and releasing front catches opens it wide, and a few passes with optical cleaning wipes (I use Zeiss’ single-use ones) will do the trick.

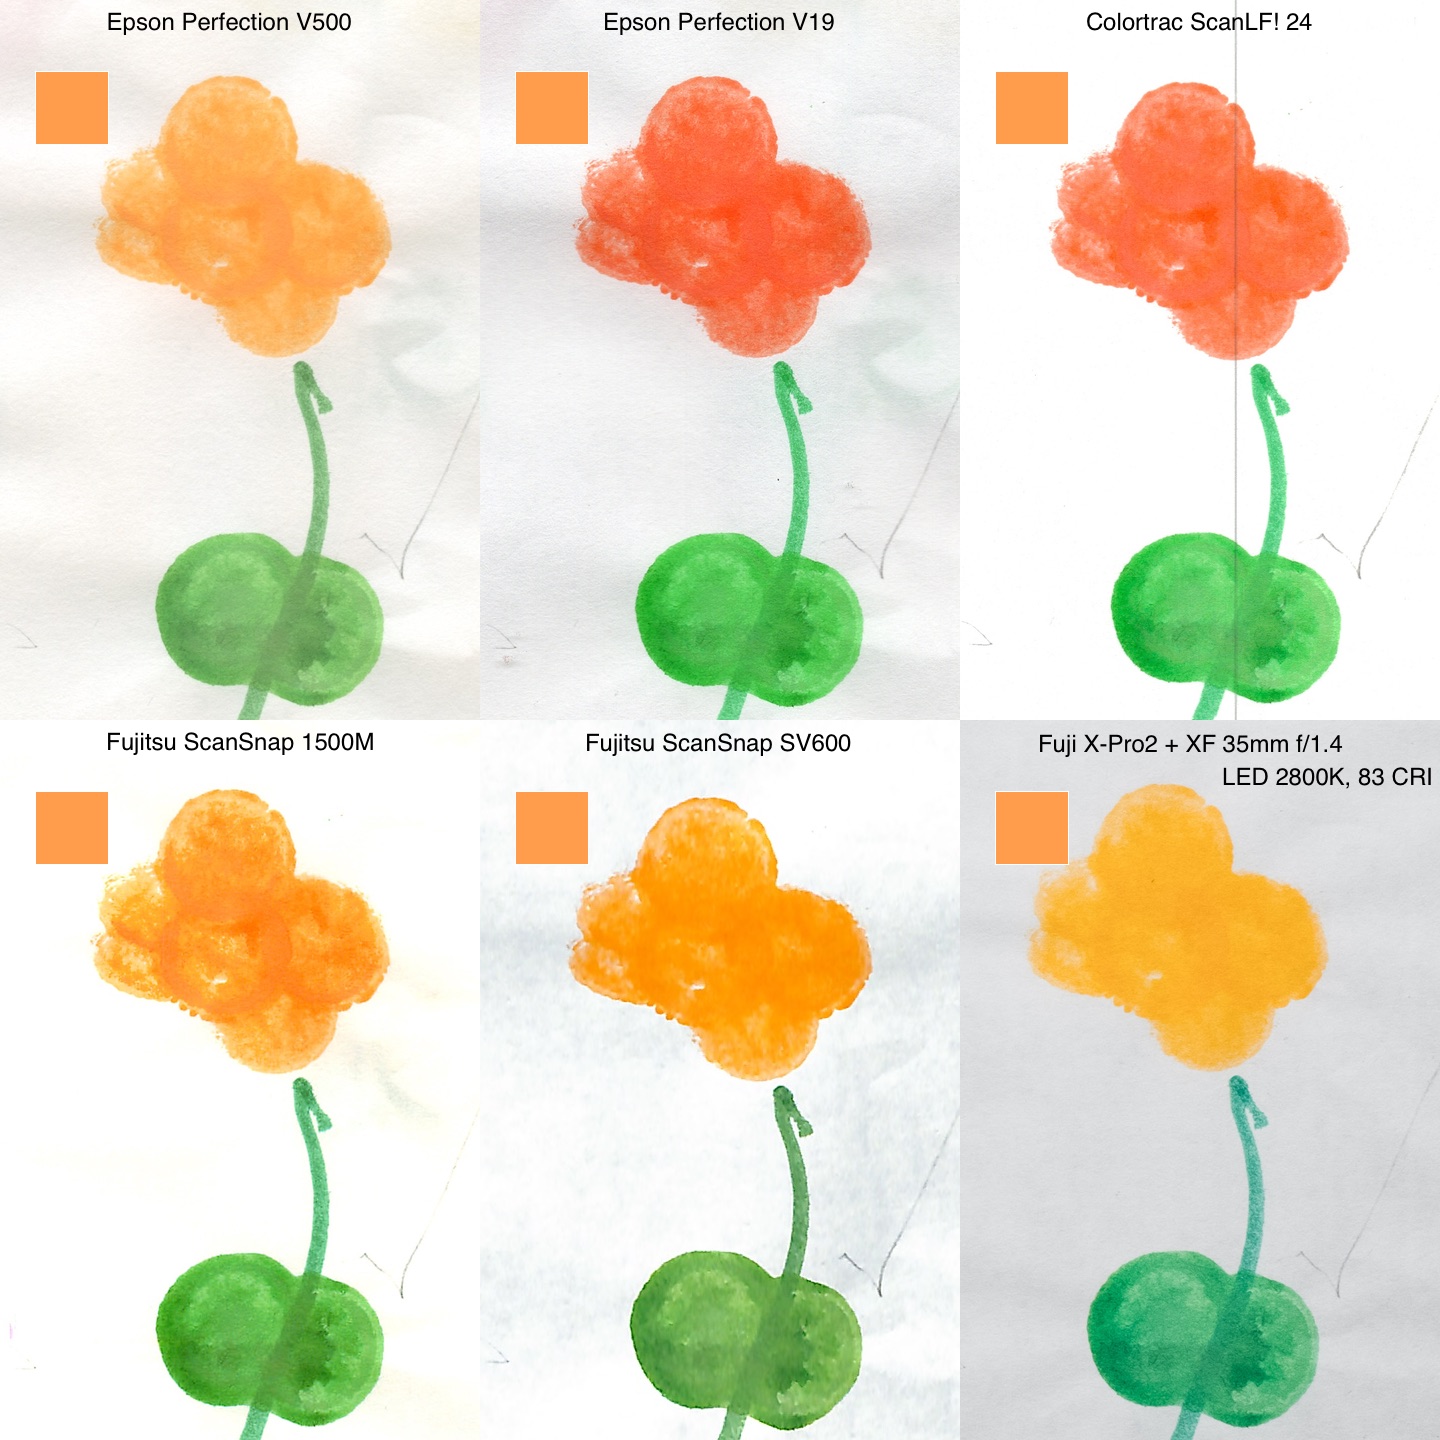
By the manufacturer’s own admission, the scanner is designed to scan technical drawings, not art. It uses a linear contact image sensor (CIS) like lower-end flatbed scanners and document scanners, unlike the higher-fidelity charge-coupled device (CCD) sensors used in higher-end graphics arts and photo scanners. The light source is a row of point light LEDs that casts relatively harsh shadows on the paper. They do make CCD scanners for graphics arts, but they start at $10,000… Contex makes an A2 flatbed CCD scanner, the HD iFlex, but it costs $6,700 (at Jet.com of all places), their iQ Quattro 2490 at $4,500 is the most viable step-up (it uses a CIS, but offers 16-bit color, AdobeRGB and beyond gamut, calibration and magnetic paper guides).

The scanner’s resolution is 600dpi. Scanning 16×24″ originals at that resolution yields a 138MP file that is nearly a gigabyte in size. The 400dpi setting yields a much more reasonable 200MB or so, and compressing them further using tiffcp with zip compression (not an option on the scanner) yields 130-140MB files.

Unfortunately, I ended up returning it. There was a 1cm scratch in the glass platen, which manifested itself as streaks. It takes quite a bit to scratch glass (I don’t think it was Lexan or similar), and I wasn’t scanning sandpaper, so it must have been a factory defect or a customer return. When I looked at the color fidelity of the scans, I was not inclined to order a replacement, and got a Fujitsu ScanSnap SV600 from Japan instead from an Amazon third-party reseller (25% savings over the US price, even if you usually forgo a US warranty on grey-market imports).

ArtisanState review

TL:DR Avoid them.

I seldom print photos any more. When I do, I prefer to make photobooks, as the format is way more convenient than loose prints, takes little space, and looks more polished than a traditional photo album.

Unfortunately, most photobooks are printed on HP Indigo digital presses, which use a technology somewhat similar to a laser printer, but capable of better quality photo reproduction. Indigo presses were originally designed to produce personalized junk-mail, not high-quality photo reproduction, and the quality, while decent, is not at the same level as that of true RA-4 photo paper exposed with a laser or LED light source as done by most digital minilabs (e.g. Fuji Frontier or Noritsu QSS) or higher-end imaging systems like the Océ/Cymbolic Lightjet or Durst Lambda.

There are higher-quality options. AdoramaPix has a good reputation for its albums, which are printed on RA-4 paper and bound in a lay-flat binding without a gutter, a technique that lends itself specially well to panoramic prints. They also have a “Hudson” line of premium albums where the photos are laminated on thick cardstock for a more luxurious feel. In researching this flush-mount process, I discovered a company called ArtisanState. It is based here in San Francisco (manufacturing is in China), their pricing seemed attractive, so I decided to give them a try.

I used a selection of my panoramic prints and ordered a 6×8 album bound in genuine leather. They offer two grades of paper, Fuji Crystal Archive Lustre and Fuji Crystal Archive Pearl Metallic, and I opted for the latter. Metallic paper, first introduced by Kodak under the Endura brand, has mica particles embedded in the RC paper base under the photographic emulsion. The photo looks as if it is painted on metal, which can be spectacular, specially with specular highlights (although I would not recommend it for portraiture such as a wedding album, the fashion industry seems to be quite fond of it). The Fuji lustre has a grainy finish that resists fingerprints, but I don’t find it attractive, and would much prefer a satin finish without an obvious texture like the one Moo uses in its business cards.

When I received my album after 2 weeks, I was impressed by the reproduction quality and the metallic effect, but there was also a very visible texture on the pages, similar to an orange peel. After some research, I found that mounting metallic papers seems to cause orange peel unless done very carefully using a low temperature on the mounting press, and they are the exception to the general rule of thumb that Fuji products are superior to Kodak’s (although true to form, Kodak’s bean counters degraded the quality of the product by cutting corners to shave costs).

At the price they charge ($104 list, but I got it at 40% promotional discount), you can rightfully expect perfection. I wrote to ArtisanState to complain, got the run-around, and reviews online suggest my experience with unresponsive support is far from unusual. I am going to try again with AdoramaPix: they may be more expensive, but the product won’t be made in China and in the end you get what you pay for.

A Passel of Miniature Tripods

The ultimate irrelevance of image quality

Months ago I showed my father how to take screen shots on his iPad and iMac, and he routinely takes them while using FaceTime video conferencing with my 1 year-old daughter. Due to poor bandwidth at home (we live in San Francisco and are subject to the tender mercies of AT&T’s not-even-third-world-grade DSL), the image quality can be described as blurry VGA at best. Yet he is happy with the results, and even made a photo book featuring many of these screenshots, showing the wide range of fleeting expressions she displays. When printed at passport photo size, the fuzziness is surprisingly passable. He has also gotten my technophobe mother in the game.

I spend a lot of time obsessing over the finer points of camera and lens technology, and how to wring the best technical quality out of my photos, but my parents show how content trumps presentation.