


Exporting secrets from the Lockdown 2FA app
The Lockdown app mentioned in this article was last updated in 2015, and if you don't already use it, I would not recommend your adopting it.
I am (very) slowly migrating away from the Mac to Ubuntu Linux as my main desktop operating system. The reasons why Apple has lost my confidence are:
- The execrable software quality of recent releases like Catalina (I plan on sticking with Mojave until I have migrated, however long that takes).
- Apple’s increasing locking down of macOS in ways antithetical to software freedom, e.g. SIP or the notarization requirements in Catalina with the denial of service implications
- The fact they no longer even pretend not to price-gouge on the Mac Pro. My days of buying their professional workstations every 5 years have come to an end after 15 years (PowerMac G5, Nehalem Mac Pro, 2013 Mac Pro)
- As the iPhone market is saturating, in their eagerness to come up with a replacement growth engine in “services”, they are pushing app developers towards the despicable and unacceptable subscription licensing model
- The butterfly keyboard fiasco exemplifies the contempt in which the company seems to hold its most loyal customers
On the plus side, ThinkPads have decent keyboards, unlike all Apple laptops since at least 2008, the LG Gram 17 is both lightweight, powerful and its huge screen is a boon to my tired eyes, and I am favorably impressed with the deep level of hardware integration offered by Ubuntu (e.g. displaying the logo and boot status in the UEFI stages of boot), even if I am not enamored of the software bloat or systemd.
One of the tasks in my migration checklist is to find a replacement for my TOTP two-factor authentication solution, which is currently the Lockdown app on iOS, iPadOS and MacOS (based on this recommendation, not to be confused with the Lockdown firewall/VPN app). I don’t trust Authy, they have a record of security failures introduced by their attempts to extend standard TOTP with their proprietary garbage, but I digress…
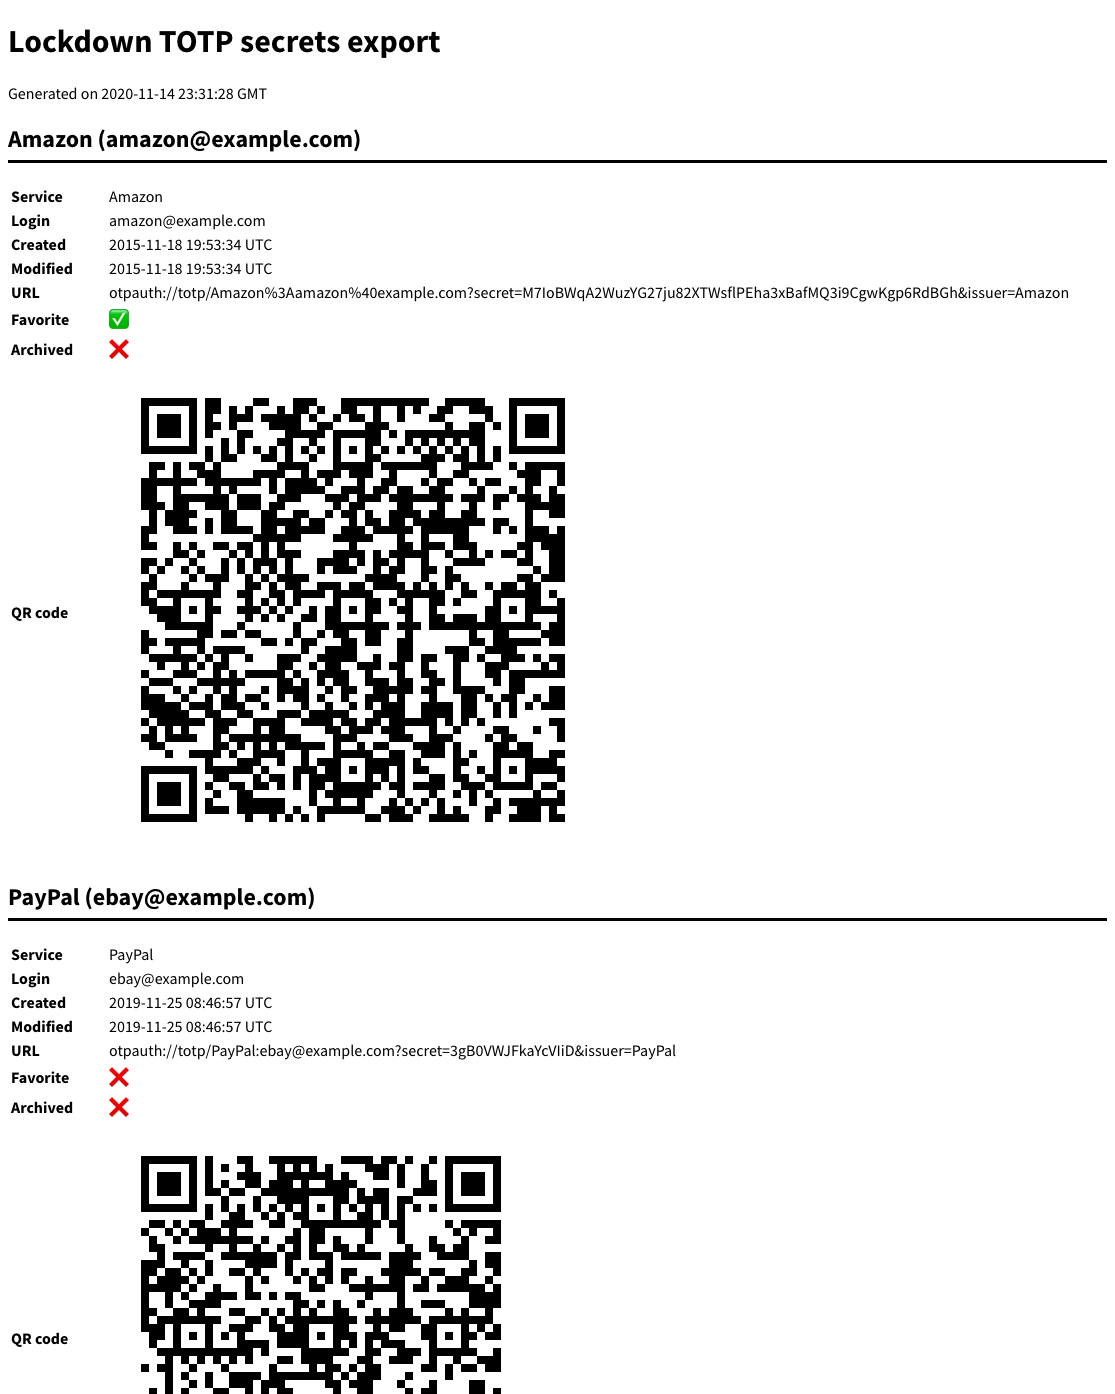
Thus I need to export Lockdown secrets. The iOS app can print or email a PDF with QR codes as a backup, but that’s not a very usable format for migration.
As I had to add a new TOTP secret to the app recently, that was the impetus to do this as a weekend project. I implemented a small utility called ldexport in Go to decode Lockdown for Mac’s internal file into either JSON or HTML format. Here are some simulated samples:
[
    {
        "Service": "Amazon",
        "Login": "amazon@example.com",
        "Created": "2015-11-18T19:53:34.969532012Z",
        "Modified": "2015-11-18T19:53:34.969532012Z",
        "URL": "otpauth://totp/Amazon%3Aamazon%40example.com?secret=M7IoBWqA2WuzYG27ju82XTWsflPEha3xBafMQ3i9CgwKgp6RdBGh\u0026issuer=Amazon",
        "Favorite": true,
        "Archived": false
    },
    {
        "Service": "PayPal",
        "Login": "ebay@example.com",
        "Created": "2019-11-25T08:46:57.253684043Z",
        "Modified": "2019-11-25T08:46:57.253684043Z",
        "URL": "otpauth://totp/PayPal:ebay@example.com?secret=3gB0VWJFkaYcVIiD\u0026issuer=PayPal",
        "Favorite": false,
        "Archived": false
    },
    {
        "Service": "Reddit",
        "Login": "johndoe",
        "Created": "2020-08-07T19:58:37.930042982+01:00",
        "Modified": "2020-08-07T19:58:37.930042982+01:00",
        "URL": "otpauth://totp/Reddit:johndoe?secret=nDTxDMI6bEgVpHWCViZjDFhXKH1bysRa\u0026issuer=Reddit",
        "Favorite": true,
        "Archived": false
    },
    {
        "Service": "GitHub",
        "Login": "",
        "Created": "2016-05-04T19:04:12.495128989+01:00",
        "Modified": "2017-04-04T06:33:10.641680002+01:00",
        "URL": "otpauth://totp/github.com/johndoe?issuer=GitHub\u0026secret=bXh5qmeTMzcatKKz",
        "Favorite": false,
        "Archived": false
    },
    {
        "Service": "Google",
        "Login": "johndoe@gmail.com",
        "Created": "2015-11-13T05:06:07.103500008Z",
        "Modified": "2015-11-13T05:06:07.103500008Z",
        "URL": "otpauth://totp/Google%3Ajohndoe%40gmail.com?secret=o5MvqdWDt7ZEHHSTuH6rCAUr4M6ozGQD\u0026issuer=Google",
        "Favorite": false,
        "Archived": false
    }
]