Aperture: first impressions
First in a series:
- First impressions
- Asset management
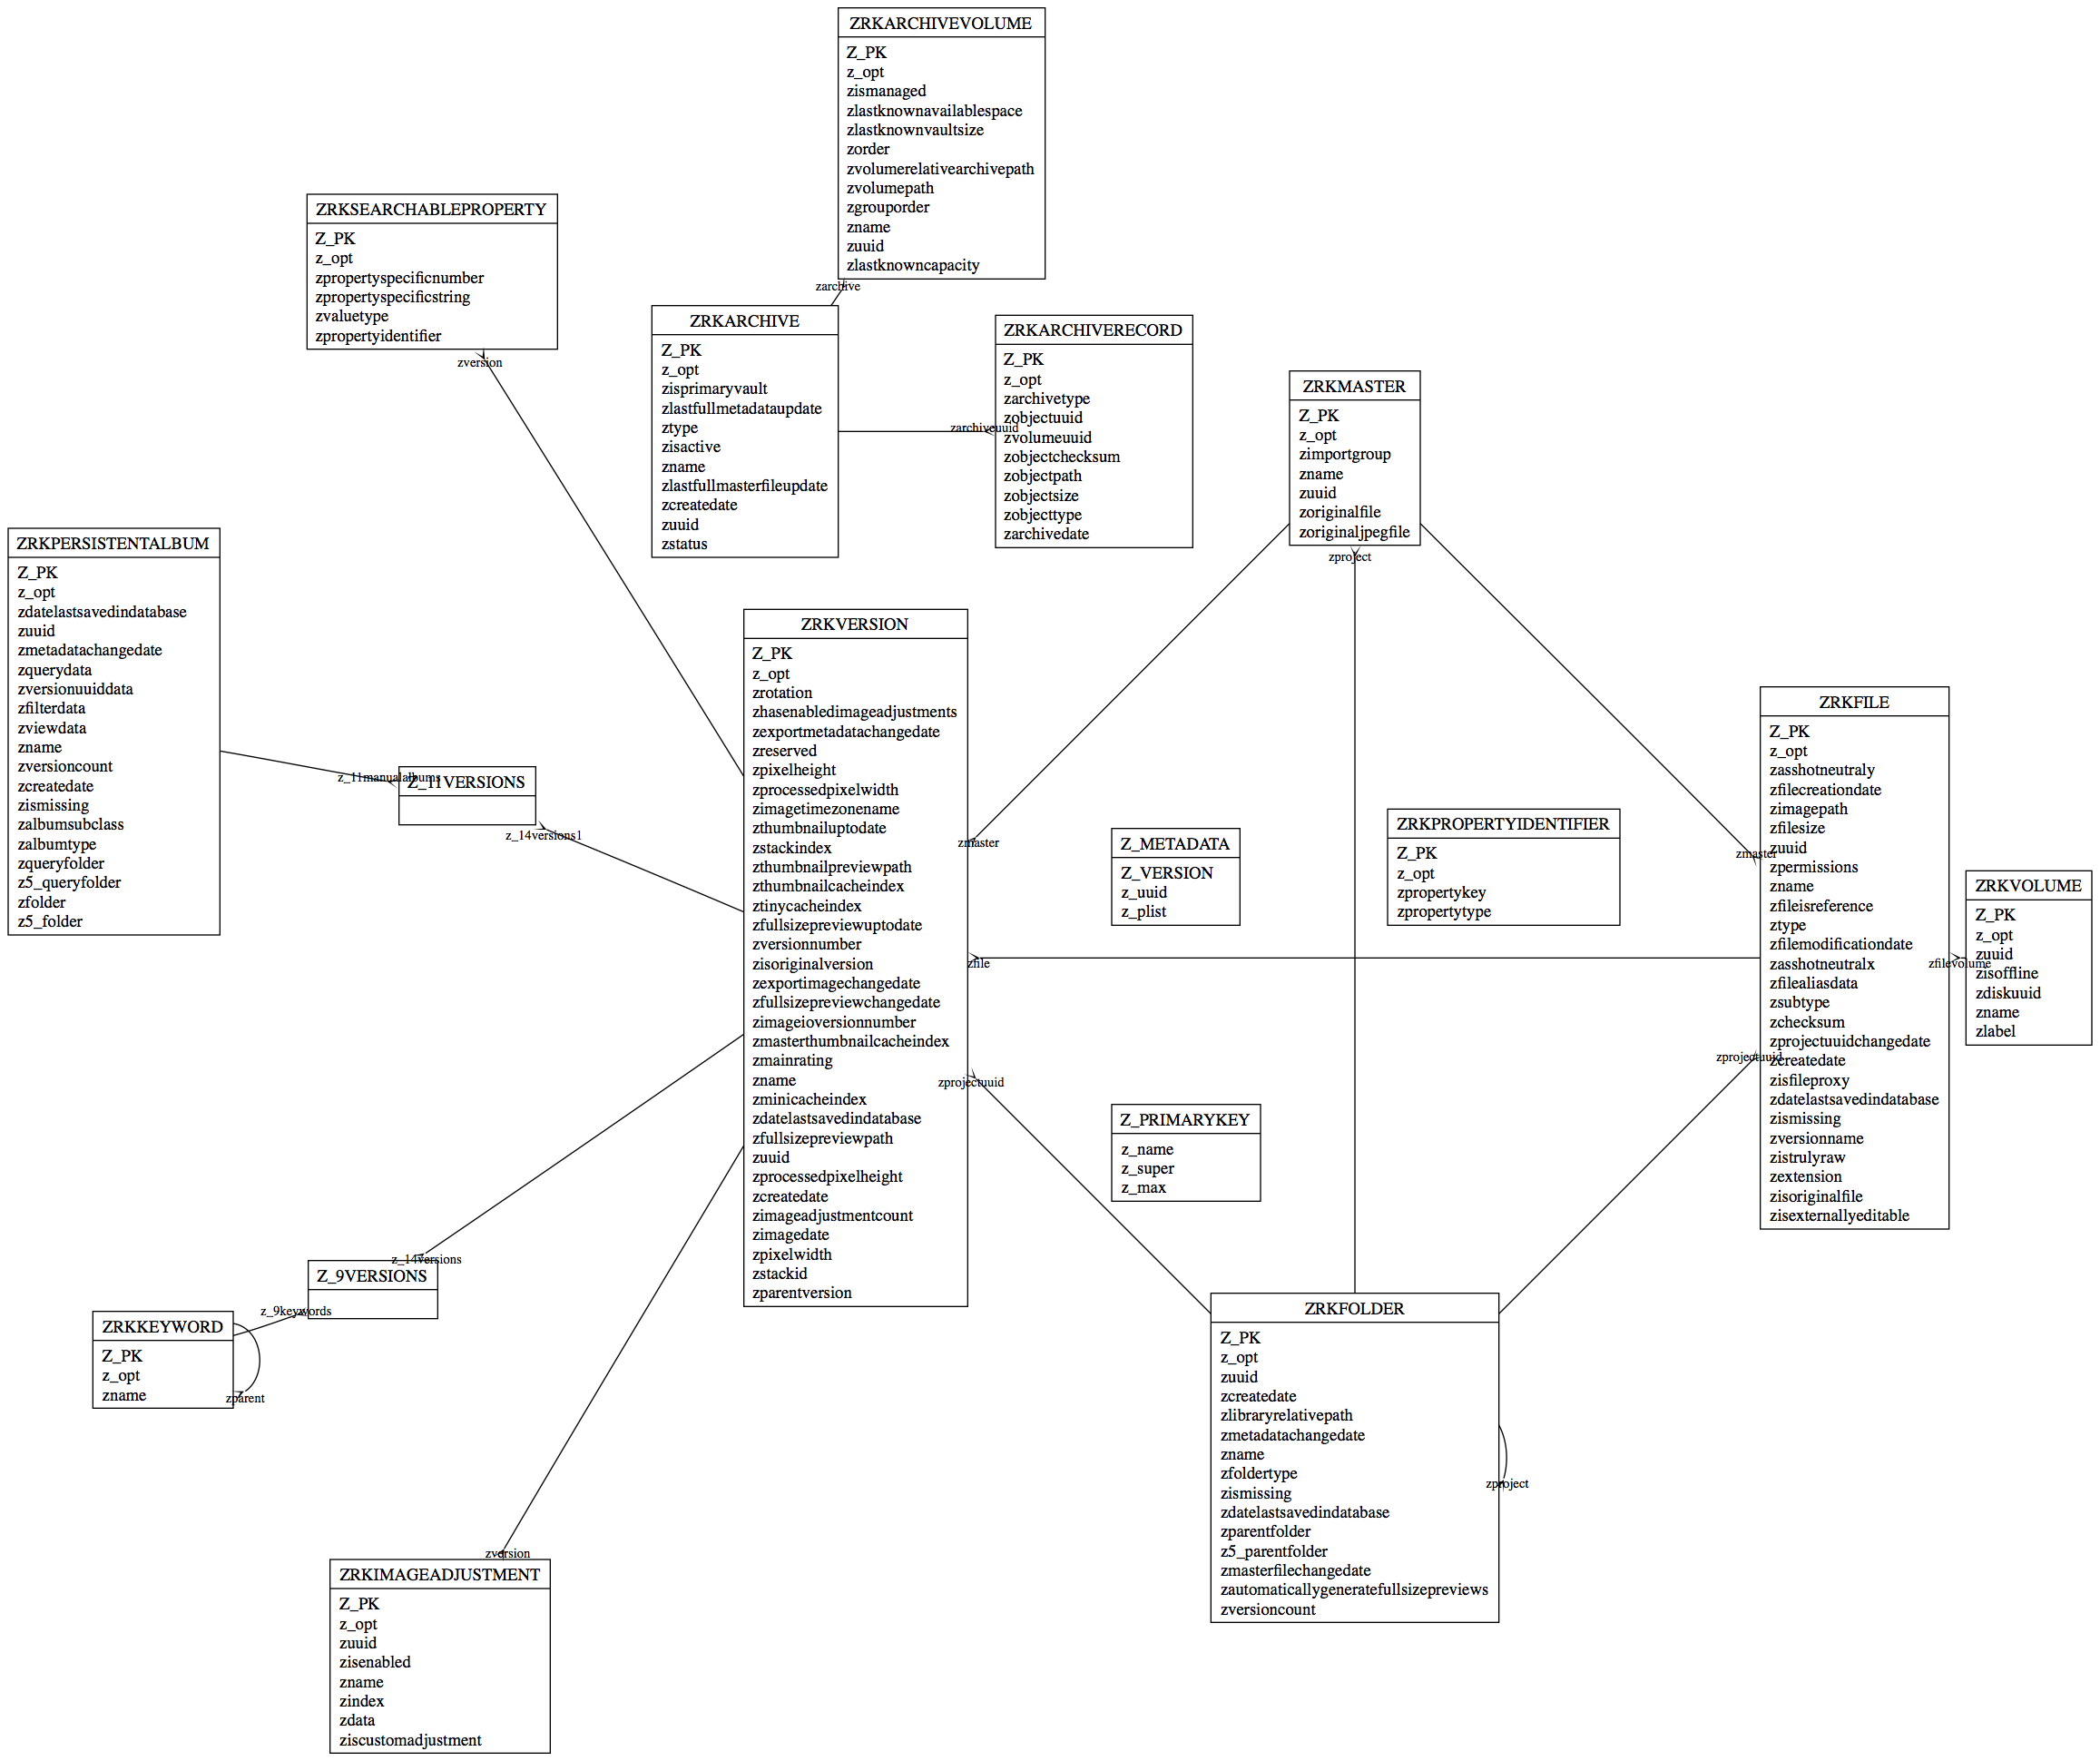
- Under the hood: file format internals
Cost and hardware requirements
The first thing you notice about Aperture, even before you buy it, is its hefty hardware requirements. I had to upgrade the video card on my PowerMac G5 (dual 2GHz, 5.5GB RAM) to an ATI X800XT, as the stock nVidia 5200FX simply doesn’t make the cut.
Aperture costs $500, not far from the price of the full Photoshop CS2. Clearly, this product is meant for professionals, just like Final Cut Pro. The pricing is not out of line with similar programs like Capture One PRO, but it is rather steep for the advanced amateurs who have flocked to DSLRs and the RAW format. Hopefully, Apple will release a more reasonably priced “Express” version much as they did with Final Cut Express.
File management
Like its sibling iPhoto, Aperture makes the annoying assumption that it will manage your photo collection under its own file hierarchy. It does not play nice and share with other applications, apart from the built-in Photoshop integration, which merely turns Photoshop into an editor, with Aperture calling all the shots and keeping both image files and metadata databases firmly to itself. Photoshop integration does not seem to extend to XMP interoperability, for instance.
This is a major design flaw that will need to be addressed in future versions — most pros use a battery of tools in their workflow, and expect their tools to cooperate using the photographer’s directory structure, not one imposed by the tool. Assuming one Aperture to rule them all is likely going to be too confining, and the roach-motel like nature of Aperture libraries is going to cause major problems down the road. Copying huge picture files around is very inefficient — HFS supports symbolic and hard links, there is no reason to physically copy files. This scheme also renders Aperture close to useless in a networked environment like a magazine or advertising agency, where media files are typically stored on a shared SAN, e.g. on XServe RAID boxes using Fibre Channel.
Fortunately, the file layout is relatively easy to reverse-engineer and it is probably just a question of time until third-party scripts become available to synchronize an Aperture library with regular Pictures folders and XMP sidecar metadata files, or other asset management and metadata databases like Extensis Portfolio or even (shudder) Canto Cumulus. Apple should not make us jump through these hoops – the purpose of workflow is to boost productivity, not hinder it. In any case, Apple is apparently hinting Aperture can output sidecar files, at least according to PDN’s first look article
Performance
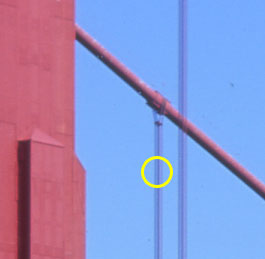
Aperture is not the lightning-fast RAW converter we have been dreaming of. Importing RAW files is quite a sluggish affair, taking 2 minutes 15 seconds to import a 665MB folder with 86 Canon Rebel XT CR2 RAW files. In comparison, Bridge takes about a minute to generate thumbnails and previews for the same images. The comparison is not entirely fair, as Aperture’s import process yields high-resolution previews that allow you to magnify the image to see actual pixels with the loupe tool, whereas Bridge’s previews are medium resolution at best. The CPU utilization on my dual G5 is far from pegged however, which suggests the import process was not particularly tuned for SMP or multi-core systems, nor that it even leverages OS X’s multithreading. Aperture will work with other formats like scanned TIFFs as well (import times are even slower, though).
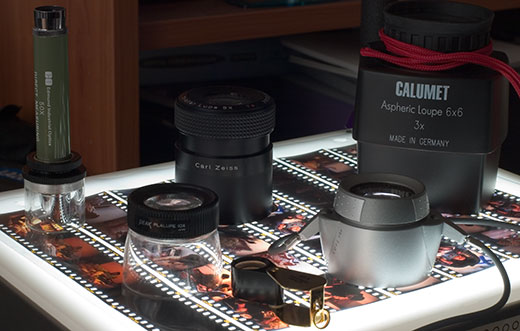
Once import is complete, viewing the files is very smooth and fast. The built-in loupe tool is particularly addictive, and very natural for anyone who has worked with a real loupe on a real light table. A cute visual effect (Quicktime, 6MB) has the loupe flip over as you reach the edges of the screen. The loupe will also magnify the thumbnails, although that will pause execution for the time it takes to read the thumbnail’s preview data into memory.
Workflow innovations
Aperture has two very interesting concept: stacks and versions. Stacks group together multiple images as one. It is very common for a photographer to take several very similar photos. Think of bracketed exposures, or a sports photographer shooting a fast action sequence at 8 frames per second, or a VR photographer making a series of 360-degree shots for use in an immersive panorama. Aperture’s stacks allow you to manage these related images as a single unit, the stack. It is even capable of identifying candidates for a stack automatically using timestamps.
Stacks
This article is work-in-progress, and this section has to be fleshed out
Versions
Versions is a concept clearly drawn from the world of software configuration control systems like CVS or Visual SourceSafe. Aperture does not touch the original image, adjustments like changing the color balance simply record the series of operations to achieve the new version of the image in the metadata database, just like CVS only stores diffs between versions of a file, to save space. This suggests Apple plans future versions of Aperture with shared image repositories, as most modern systems work that way, with a shared central repository, and individual copies for each user, with a check-in/check-out mechanism with conflict resolution.
The parameters for a transform take a trifling amount of memory, and the photographer can experiment to his heart’s content with multiple variants. Photoshop now has equivalent functionality with the introduction of layers comps in CS, but they still feel like bolted-on features rather than integral to the product.
In the early nineties, French firm FITS introduced a groundbreaking program named Live Picture to compete with Photoshop. Its chief claim to fame was that it could deal with huge images very efficiently, because it recorded the operations as a sequence of mathematical transforms rather than the result, in a way eerily reminiscent of PostScript. The transforms were only applied as needed at the display resolution, thus avoiding the need to apply them to the full-resolution image until the final output was required, while still managing to deal with zooming adequately. The software was promising, but the transformation logging technique limited the types of operations that could be performed on images, and due in part to its high price and specialized scope, the product died a slow and painful death. In its current incarnation, it lives on, after a fashion, in the moribund Flashpix image format and a web graphics server program imaginatively named ImageServer.
Chained transforms is a very elegant approach when compared to the brute-force of Photoshop — in Aperture a finished image is represented as a master image and a series of transformations to be applied to it to achieve each version, much like Photoshop keeps a history of changes made to the image in memory (but not in the final disk file). Since Aperture’s transforms are fairly simple, they can be executed in real time by modern graphics cards that support Core Image.
Target market
Keep in mind there are two types of pro photographers: those who divide photographers in two groups, and the others… More seriously:
- Those who try to build up a portfolio of images over their career, where royalties and residual rights will provide them with financial support when they retire. Most fine art, landscape or nature photographers are in this category, and photojournalists could be assimilated (except their employer owns the rights to the archive in the latter case).
- Those who do work-for-hire. Wedding photographers, event photographers, product, catalog, advertising and industrial photographers fit in this category.
The first type need a digital asset management database to retrieve and market their images more effectively, and a distribution channel. Most farm out that representation work to the likes of Corbis or Getty Images.
The second type will work intensely on a project, take a lot of frames and show many variants to a client for approval. Once the project is done, it is archived, probably never to be used again, and they move on to the next one. In most cases, the rights to the images remain with those who commissioned them, not the photographer, and thus there is no incentive to spend much effort in organizing them with extensive metadata beyond what is required for the project. These users need a production workflow tool that will streamline the editing and client approval process, the latter mostly performed via email or password-protected websites nowadays.
Aperture’s projects (flat, not nested hierarchically, and thus not all that scalable) and vaults (archives where projects go when they are no longer needed or finished) are a clear indication it is intended mostly for the second type of photographer. Apple did not convey the specialized focus of the product forcefully enough, but the blogosphere’s buzz machine bears much of the blame for raising unwarranted expectations about what the product is about.
Aperture is good for one thing: let wedding photographers and the like go through the editing (as in sorting through slides on a light table, not retouching an individual image) as efficiently as possible. Most wedding pros simply cannot afford the time to individually edit a single picture beyond white balance, tonal adjustments, cropping and sharpening, and Aperture’s built-in tools are perfectly adequate for them.
That is also why there is such a slow import process — this prep work is required to make the actual viewing, side by side comparison, sorting and manipulation as smooth, interactive and responsive as possible to avoid disrupting the photographer’s “flow”. The goal is to have a very smooth virtual light table, not a filing cabinet, where you can move slides around, group them in stacks, toy around with versions, and compare them side by side on dual 30 inch Cinema Displays. The user experience was clearly designed around what the average art director (with his or her loupe almost surgically implanted) is familiar and comfortable with.
The positioning as “iPhoto Pro” obscures the fact that Aperture is sub-optimal for managing or indexing large archives with rich metadata. For the first type of pro photographer (which is also what the average advanced amateur will relate to), a digital asset management database like the excellent Kavasoft Shoebox or the more pedestrian but cross-platform and workgroup-oriented Extensis Portfolio and Canto Cumulus will better fit their needs, with Adobe Bridge being probably sufficient for browsing and reviewing/editing freshly imported photos (when it is not keeling over and crashing, that is).
Conclusion
Aperture is clearly a 1.0 product. It shows promise, but is likely to disappoint as the reality cannot match the hype that developed in the month or so between the announcement and the release. The problem is that there is a Cult of the Mac that raises unrealistic expectations of anything coming out of Cupertino.
The hype around Aperture was certainly immense, I am sure Apple was as surprised as any by how positive the response was (after all, they released Aperture at a relatively obscure pro photo show). They are probably furiously revising plans for the next release right now. I consider Aperture 1.0 more a statement of direction than a finished product.
 For a real-world test, I took my


